Showing posts with label Cake Decorations. Show all posts

Wednesday, July 18, 2012

Elmo Birthday Cake

I wanted to make a birthday cake for my niece's 2nd birthday and her mom told me that she's into Elmo and Barney.  I'm not very partial to Barney so I decided to make an Elmo cake.  Her mom also wanted to stay away from too much food coloring so the cake is carrot cake with buttercream frosting; I also made and placed the decorations in a way so they could be easily taken off.  Since my niece is turning 2 and won't be a baby much longer, I made a "baby Elmo" cake topper.


Instead of rimming the bottom of the cake completely with fondant, I sporadically grouped fondant balls (so they can be easily taken off).


Right view:


Left view: 


Aerial view:  The letters were cut out of a mixture of fondant and gum paste and I surrounded each letter with sugar confetti (I put them on one at a time with tweezers).  I thought the mosaic effect of the confetti was pretty cool!


Sesame Street sign: I used yellow sprinkles to create the sign's border.


One more picture:


 HAPPY BIRTHDAY ADDY!!!

Thursday, July 5, 2012

Brave Cake Truffles

These "Brave" cake truffles from the Scotland Highlands were for a 9-yr old's family birthday party.  Her mom basically asked me to create something for her daughter and mentioned that her daughter really wanted to see "Brave" for her birthday.  I wavered between making "Brave" cake pops or cake truffles, but due to the design, I settled on cake truffles.


The design of the two dozen "Brave" cake truffles include Melinda, a target & arrow, Eleanor's crown, three bears, and gold leaves with yellow pearls.  The butter and chocolate cake truffles were first covered with blue candy melt and then covered with a piece of blue fondant to achieve a smooth finish.  All of the decorations were hand-molded from fondant with the exception of the leaves and flowers; I used a cutter.

Close ups:


Aerial view:


Packaged and ready to go!


HAPPY BIRTHDAY!!!

Sunday, April 29, 2012

Sports Baby Shower

This was a sports-themed baby shower and the client wanted a main cake as well as cake truffles to give away as shower favor.  The bottom tier of the cake was Belgian chocolate covered with chocolate buttercream, and the top layer was red velvet covered white buttercream.  


I started covering the bottom layer with different stripes of brown and blue (two different widths of blue), then covered the entire top tier with a piece of blue fondant before decorating it.  I pretty much had to mix and knead the blue, orange, and brown colors of fondant.


The decorations on top were made of a mixture of white chocolate and fondant.  The baseball cap with a "W" is made of fondant, as is the basketball.  The golf ball and baseball were solid pieces of white chocolate; the red on the baseball is fondant.  For the soccer ball, the base was also a solid piece of white chocolate, but then it was covered by individual pieces of black and white fondant to achieve the soccer pattern.


 For the party favors, I created 35 plain baby blue cake truffles dusted with light blue shimmer (not pictured).  These were cookies and cream...yummy!  I also made 25 baseballs and 10 soccer balls that were butter cake on the inside.  The soccer balls took the longest because I had place each hexagon and pentagon on individually.


I hope everyone had a blast at the baby shower!

WELCOME BABY WIGHT!!!

Friday, February 10, 2012

1st Birthday Cake Decorations

This was  my first out-of-state order!  A lady wanted to make a 1st birthday cake for her granddaughter and saw a cake very similar to the cake below.  Even though she had never worked with fondant before, she was willing to make the cake herself but wanted help with the decorations and the cake board.  She found me online and it was really great to work with her!  :)

Below is her picture of the finished cake:


Since she already had the tiara, I ended up making the "1st Birthday Princess Saalaya" sign, the hearts, the flowers, the butterflies, the lilac pearls around the base of the cake, and the cake board.  Everything was pink and lilac, but the pictures make the lilac look a little bluish.  I mixed both the pink and lilac fondant colors.  Once I finished everything, I meticulously packed everything inside jewelry boxes before I packaged everything in a larger box and ended up having to make my own box to mail the cake board.


 Here are the butterflies, hearts, and flowers I placed in the jewelry boxes.  The butterflies have pink shimmer on them and the hearts and flowers were powdered with lilac shimmer.


I rolled the lilac pearls for the base individually, and I definitely underestimated the amount of time it would take me since I wanted every pearl to be smooth and similar in size.  It ended up taking 1 1/2 hrs!


Fondant letters were not as easy as I thought they would be because the letters are so slim and soft and stretch out easily.  I had to redo many of the letters and keep "ironing" out the heart to make sure the heart was large enough to fit all the letters.


For the board, I hand-painted all the butterflies and hearts in edible colors and glued a pretty pink ribbon around the edge.  My client sent me a picture after she put everything together.  I thought everything turned out beautifully!


HAPPY BIRTHDAY PRINCESS SAALAYA!

Wednesday, December 21, 2011

Butterfly Birthday Cupcake Cake Pops

What a tongue twister.....these fluttery cake pops were for a special little girl's sixth birthday party.  Their garage was turned into a dance studio (disco ball and all) where an instructor taught the girls various dances (what a cute idea).  The family already had a Tinkerbell cake, so I decided to make whimsical cake pops.


 For these butter cake flavored cake pops, I used a cupcake mold to achieve the shape.  I first dipped the bottom into chocolate candy melt, and when it dried, I dipped the top into pale pink candy melt.

Here they are before any embellishments: 


I needed to "jazz" them up so I dusted each cupcake with pink shimmer dust (look closely):


They still weren't jazzy enough for me so I added lavender sugar sprinkles:

Next, I marbleized pink fondant, stamped out butterflies, and shaped the wings.


Once the butterflies were allowed to set, I gave each butterfly a white sugar-pearl head.  All the butterflies also received a coating of glimmering pixie dust:


I attached the butterflies to the cake pops using pink candy melt and arranged all of them in a wooden basket with a bright pink bow.


And since I had one butterfly left, I placed it in the middle of the bow.


I really just wanted the butterflies to be able to fly away on their own.....


Butterflies drink nectar, but nectar comes from flowers, so I add a ring of pink and yellow orchids around the outside of the cupcake bouquet.  When I showed up to deliver the butterfly cake pop basket, all the young girls swarmed me.  I was so happy to see their delighted faces since I don't usually don't get to see the reactions!  :D


HAPPY BIRTHDAY IVY!!!

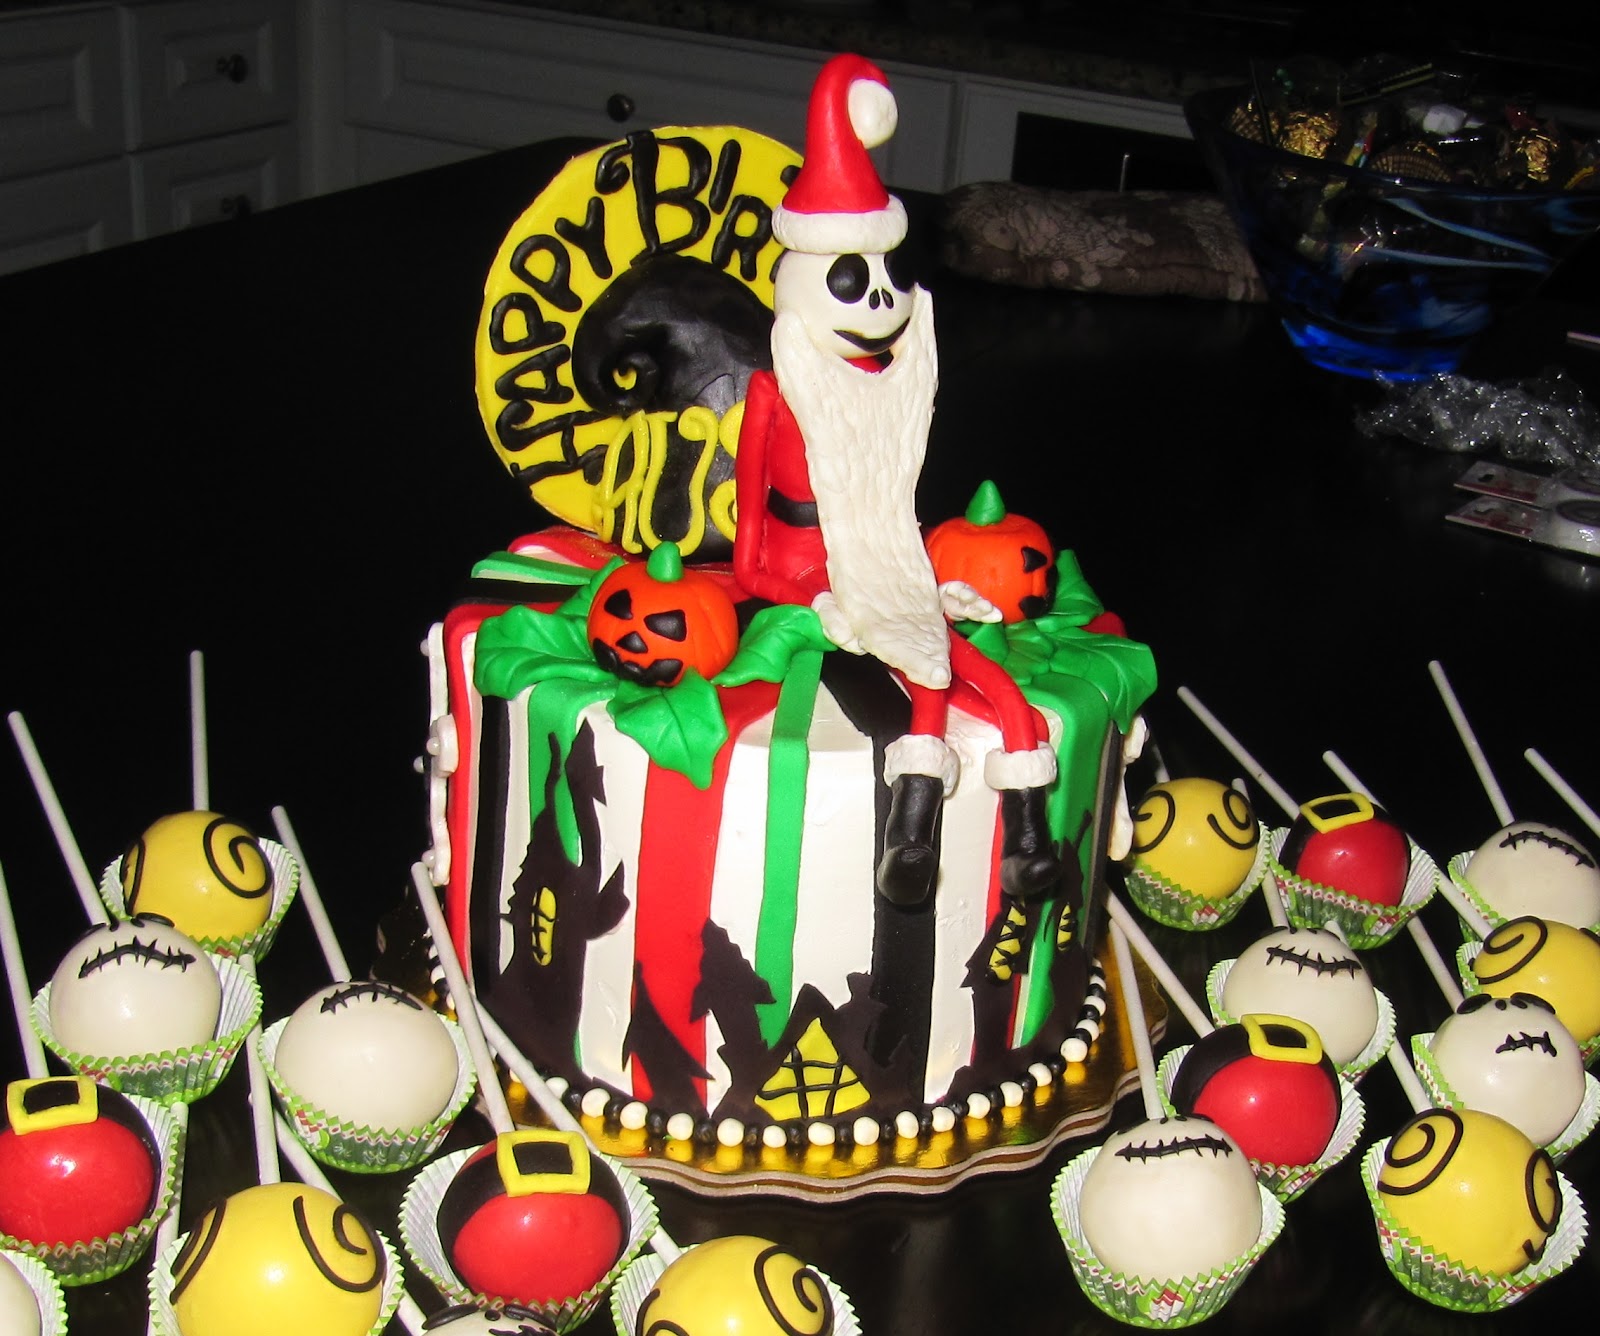
The Nightmare Before Christmas...

" 'Twas the night before Christmas, when all through the house.  Not a creature was stirring, not even a mouse..." and so begins the legendary poem by Clement C. Moore.

This event was for a surprise birthday party (shhhh...it's this Friday) and since the birthday guy's favorite holiday happens to be Halloween, I used "The Nightmare Before Christmas" as the theme.  I was asked to combine the birthday theme with Christmas, and since I've always loved the characters in "The Nightmare Before Christmas", I was super excited to begin this project.


A couple weeks before the event, I begin researching ideas and envisioning what I wanted the cake to look like and eventually drew this picture.  As you can see from the photo above, I actually stuck pretty close to my original design (which doesn't always happen)!


Because I wanted to focus on decorating, I outsourced the 6" velvet cake from one of my favorite bakeries and asked them to simply cover it with buttercream.  At home, I cut multi-width strips of black, red, and green fondant and laid them aside to dry out a bit.  This is actually a bit more complicated and time-consuming than it looks.

Meanwhile, I cut a building silhouette out of sugar paper which was no small feat (for so many nooks and crannies) since sugar paper breaks easily.  After placing the colored strips where I wanted, I adhered the silhouette to the side of the cake with frosting and made some windows out of fondant.


Next, I rolled black and white fondant pearls and lined the base of the cake:


Now it was time for Jack, who was an architectural challenge (skinny legs, arms, hat, and tricky beard).  The arms were still too flimsy after several hours so I set Jack aside while I worked on the iconic moon and hill.  His arms ended up drying overnight and then almost for another day.

Here is armless Jack (his arms are behind his body):

Next in line to make were the pumpkins, which I nestled on top of curled holly leaves.  I also decided to make a couple of snowflakes for the side of the cake.


Here is the whole cake assembly, minus Jack...still waiting for Jack.....


 Left view & right view:


And finally...Jack!


Again, left view & right view:


More close ups:


Time to make some cake pops.  I already had the Santa Claus bellies from the previous post, so I made some Jack cake pops and created a design on yellow cake pops to complement the moon and the hill motif.


All the Jack's have different faces:


And voila!  Here is the whole display:


Aerial view:


Almost everything looked great to me when I retired upstairs for the night, but one little thing kept bugging me: the back of the moon.  I had covered it in candy melt so it would stand up, but I didn't like the look of it (see below).  Cakes are meant to be seen from 360 degrees, and I cringed at the thought of someone seeing the back of the moon, so I slept on it...


My solution the next morning were two more pieces of fondant on the back of the moon:


Packaging the cake pops for delivery:


This project was super fun but also challenging.  Estimation of total hours: 12 hrs.  But then again, there's the saying, "when you do what you love," it doesn't feel like work...I love doing this!!

HAPPY BIRTHDAY AUSTIN,
and I hope you enjoy your cake and cake pops!  I've been requested not to post this up on Facebook until Friday night!  :)

Here's one more picture!


Merry Christmas Everyone!!!