Wednesday, December 21, 2011

Butterfly Birthday Cupcake Cake Pops

What a tongue twister.....these fluttery cake pops were for a special little girl's sixth birthday party.  Their garage was turned into a dance studio (disco ball and all) where an instructor taught the girls various dances (what a cute idea).  The family already had a Tinkerbell cake, so I decided to make whimsical cake pops.


 For these butter cake flavored cake pops, I used a cupcake mold to achieve the shape.  I first dipped the bottom into chocolate candy melt, and when it dried, I dipped the top into pale pink candy melt.

Here they are before any embellishments: 


I needed to "jazz" them up so I dusted each cupcake with pink shimmer dust (look closely):


They still weren't jazzy enough for me so I added lavender sugar sprinkles:

Next, I marbleized pink fondant, stamped out butterflies, and shaped the wings.


Once the butterflies were allowed to set, I gave each butterfly a white sugar-pearl head.  All the butterflies also received a coating of glimmering pixie dust:


I attached the butterflies to the cake pops using pink candy melt and arranged all of them in a wooden basket with a bright pink bow.


And since I had one butterfly left, I placed it in the middle of the bow.


I really just wanted the butterflies to be able to fly away on their own.....


Butterflies drink nectar, but nectar comes from flowers, so I add a ring of pink and yellow orchids around the outside of the cupcake bouquet.  When I showed up to deliver the butterfly cake pop basket, all the young girls swarmed me.  I was so happy to see their delighted faces since I don't usually don't get to see the reactions!  :D


HAPPY BIRTHDAY IVY!!!

The Nightmare Before Christmas...

" 'Twas the night before Christmas, when all through the house.  Not a creature was stirring, not even a mouse..." and so begins the legendary poem by Clement C. Moore.

This event was for a surprise birthday party (shhhh...it's this Friday) and since the birthday guy's favorite holiday happens to be Halloween, I used "The Nightmare Before Christmas" as the theme.  I was asked to combine the birthday theme with Christmas, and since I've always loved the characters in "The Nightmare Before Christmas", I was super excited to begin this project.


A couple weeks before the event, I begin researching ideas and envisioning what I wanted the cake to look like and eventually drew this picture.  As you can see from the photo above, I actually stuck pretty close to my original design (which doesn't always happen)!


Because I wanted to focus on decorating, I outsourced the 6" velvet cake from one of my favorite bakeries and asked them to simply cover it with buttercream.  At home, I cut multi-width strips of black, red, and green fondant and laid them aside to dry out a bit.  This is actually a bit more complicated and time-consuming than it looks.

Meanwhile, I cut a building silhouette out of sugar paper which was no small feat (for so many nooks and crannies) since sugar paper breaks easily.  After placing the colored strips where I wanted, I adhered the silhouette to the side of the cake with frosting and made some windows out of fondant.


Next, I rolled black and white fondant pearls and lined the base of the cake:


Now it was time for Jack, who was an architectural challenge (skinny legs, arms, hat, and tricky beard).  The arms were still too flimsy after several hours so I set Jack aside while I worked on the iconic moon and hill.  His arms ended up drying overnight and then almost for another day.

Here is armless Jack (his arms are behind his body):

Next in line to make were the pumpkins, which I nestled on top of curled holly leaves.  I also decided to make a couple of snowflakes for the side of the cake.


Here is the whole cake assembly, minus Jack...still waiting for Jack.....


 Left view & right view:


And finally...Jack!


Again, left view & right view:


More close ups:


Time to make some cake pops.  I already had the Santa Claus bellies from the previous post, so I made some Jack cake pops and created a design on yellow cake pops to complement the moon and the hill motif.


All the Jack's have different faces:


And voila!  Here is the whole display:


Aerial view:


Almost everything looked great to me when I retired upstairs for the night, but one little thing kept bugging me: the back of the moon.  I had covered it in candy melt so it would stand up, but I didn't like the look of it (see below).  Cakes are meant to be seen from 360 degrees, and I cringed at the thought of someone seeing the back of the moon, so I slept on it...


My solution the next morning were two more pieces of fondant on the back of the moon:


Packaging the cake pops for delivery:


This project was super fun but also challenging.  Estimation of total hours: 12 hrs.  But then again, there's the saying, "when you do what you love," it doesn't feel like work...I love doing this!!

HAPPY BIRTHDAY AUSTIN,
and I hope you enjoy your cake and cake pops!  I've been requested not to post this up on Facebook until Friday night!  :)

Here's one more picture!


Merry Christmas Everyone!!!

Sunday, December 18, 2011

IT'S BEGINNING TO LOOK A LOT LIKE CHRISTMAS...

Actually, it's been looking like Christmas for a while now, and Christmas is only a week away!  A friend needed a Christmas present for her boss, and since they have two granddaughters, she asked me to make cake pops with "just any X-mas theme."  I found these snowman and Santa Claus bellies online (I love that they are just the belly) and mostly recreated them, with butter cake and vanilla frosting on the inside.  The hats are an inverted chocolate candy melt with a Rolo candy on top, and I added green autumn leaf sprinkles (I didn't have holly sprinkles on hand) and piped berries onto the hat for a little pizzazz.  The snowmen's carrot noses are made of fondant, as are their eyes and mouths.


A few close-up pictures are always a must! I gave the snowmen a bit of color on their cheeks by brushing on pink shimmer dust. If these snowmen had hands, I believe they'd tip their hats!

Upon further investigation (by eating), we can safely conclude that Santa's belly is a cake belly and not a beer belly:


 One more week until Christmas...


Tuesday, December 13, 2011

Winter Penguins


A friend and I made these cozy little penguins for fun...the holidays are always an excuse to make something!  We decided to dip them in ice blue since we didn't have enough black candy melt, and I thought they turned out pretty adorable.  Each penguin was warmed up with a scarf, earmuffs, or a beanie.  The scarves were surprisingly the most difficult to make because the long strand of fondant kept cracking.  All the penguins are butter cake on the inside.

Here's a picture with a funny effect; the penguins look like they have blue eyes in this one.  Brrrr........


We packed some of the penguins away in their igloo for house-to-house transfer, and apparently, one of the "naked" penguins was immediately eaten upon arrival!

Merry Christmas and Happy Holidays!

Saturday, December 3, 2011

HAPPY 60TH BIRTHDAY CAKE DECORATIONS

Note: I only make the decorations that went on top of this cake; I did not make the cake itself.

My friend wanted me to only make cake decorations for her husband's 60th birthday celebration.  She made her own cake which were two carrot cakes iced together and then she had me decorate the cake the day of the party.  Because they own an ophthalmology medical devices company, she wanted me to tie-in an eye theme along with a little bit of Christmas.  I decided to make a sculpture of the man of honor, a pair of gold spectacles, some Christmas ornaments, their beloved family cat, and several pairs of eyeballs without red blood vessels (I thought it would be too Halloween-like for a 60th birthday celebration).


 When I arrived at the house, below was what I was given to decorate...I was initially a bit troubled by the unevenness of the sheet cake, but it was really just a background for a winter wonderland, right?


Once I placed all the decorations on the cake, it turned out to be quite cute!


Candy canes braced the corners of the cake, and I even added some blue snowflakes to the top and side of the cake to add some color (and to cover up wrinkles).  I placed edible pearls on the snowflakes on top of the cake.


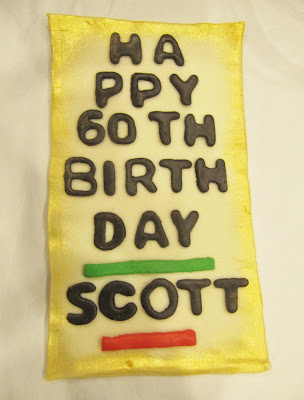
I came up with the idea of making an eye chart to contain the birthday message, but when I looked online for a sample eye chart, I realized I wasn't the only person with this great "eye-dea" (haha)!  I had to modify the chart to create an aesthetically pleasing birthday message, but all that mattered was that everyone immediately recognized it as an eye exam chart.  I worried that the chart would look too plain against a white cake so I gilded the edges of the eye exam chart which also contributed to the sophistication of a 60th birthday.  This would also make a great optometry or ophthalmology cake!


 Here is the cake displayed on the dessert table during the party. 


Happy 60th Birthday Scott!